
Plumbing Basics Every Homeowner Should Understand
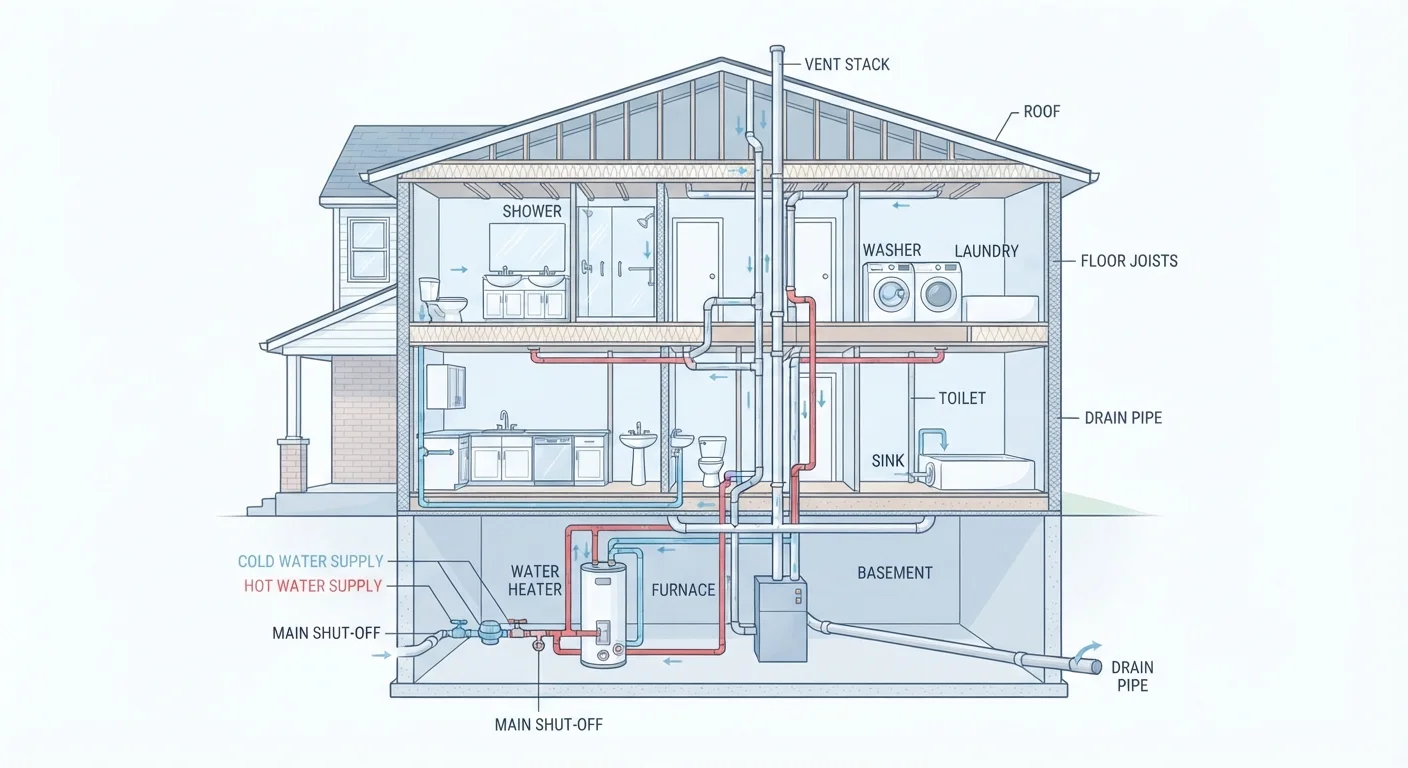
Photo credit: Wiseturt.com | Blogs Curated For You
In this article
You don't need to be a plumber to protect your home's water system. A plain-language introduction to pipes, valves, and early warning signs.
Key Takeaways
- Your home has two separate pipe systems: one brings clean water in, the other carries wastewater out.
- Knowing where your main shutoff valve is can limit water damage during an emergency.
- Low water pressure, slow drains, and wet spots on walls are early signs worth investigating.
- Many basic tasks - checking for leaks, cleaning aerators - are safe for homeowners to do themselves.
- Work involving pipes behind walls, gas lines, or permit-required changes should go to a licensed professional.
How Your Home's Water System Is Organized
Every residential plumbing system runs on two parallel networks working in opposite directions. The supply system brings pressurized fresh water into your home from a municipal main or private well. The drain-waste-vent (DWV) system carries used water and waste out to the sewer or septic tank, relying on gravity rather than pressure.
Supply pipes are typically smaller in diameter and always under pressure. DWV pipes are larger, slope downward, and include vent pipes that run up through the roof to release sewer gases and maintain proper drainage flow. If you notice slow drains throughout the house rather than at one fixture, the DWV side - not the supply - is usually where the issue lies.
Supply system
The network of pressurized pipes that delivers fresh, clean water from a municipal main or well to every fixture in your home.
Drain-waste-vent (DWV) system
The set of larger pipes that carries used water and waste away from fixtures by gravity, plus vent pipes that allow air in so drainage flows freely.
P-trap
The curved pipe section beneath sinks and drains shaped like a 'P' - it holds a small amount of water that blocks sewer gases from entering the home.
Pressure regulator
A valve installed on the main supply line that reduces incoming water pressure to a safe level for your home's pipes and fixtures.
Shutoff valve
A valve that, when closed, stops the flow of water either to the entire house (main shutoff) or to a single fixture (fixture shutoff).
Aerator
A small screen screwed onto a faucet's tip that mixes air into the water stream to reduce flow rate and filter out debris.
Knowing this two-system structure helps you describe problems accurately and understand why a plumber might inspect your roof vents when your sink drains slowly.
Valves Every Homeowner Should Locate
Valves are your first line of defense when something goes wrong. Locate these three before you ever need them:
- Main shutoff valve: Cuts water to the entire house. Commonly found in the basement, crawl space, utility closet, or near the foundation. Turning it fully clockwise stops all water flow. Practice finding and operating it now - not during a burst pipe emergency.
- Fixture shutoff valves: Small valves behind toilets and under sinks control water to individual fixtures. These let you stop water at one location without shutting off the whole house.
- Water heater shutoff: Located on the cold-water inlet pipe feeding the heater. Know this one if the tank ever starts leaking.
Label Your Valves Now
After you locate each shutoff valve, label it with a piece of masking tape and a marker. In a stressful moment - like water spraying from a burst pipe - a clear label saves critical seconds. Take a photo of each valve's location and save it in your phone for quick reference.
If your home has an irrigation system, locate its shutoff separately - outdoor lines freeze first in cold weather. For a seasonal checklist that includes outdoor faucets and irrigation, see our guide to winterizing your home before a hard freeze.
Early Warning Signs of Plumbing Problems
Catching a plumbing issue early is almost always cheaper than waiting. Watch for these signals:
- Unexplained increase in your water bill - often the first sign of a hidden leak.
- Slow or gurgling drains - a single slow drain usually indicates a local clog; multiple drains affected at once can point to a venting or main-line issue.
- Discolored water - orange or brown tinting often means corroding pipes; blue-green staining near faucets can indicate copper pipe corrosion.
- Soft spots, stains, or peeling paint on walls and ceilings - these are hallmarks of a slow in-wall or under-floor leak.
- Low pressure at multiple fixtures simultaneously - may indicate a partially closed valve, a failing pressure regulator, or mineral buildup in older supply lines.
Don't Ignore Multiple Slow Drains
When more than one drain in your home runs slowly at the same time, it often signals a blockage or venting problem deeper in the system - not individual fixture clogs. Attempting to snake every drain yourself without diagnosing the root cause can push the blockage further down. Have a plumber inspect the main drain line.
Musty odors combined with any of the above signs can indicate mold growth behind walls - a condition that warrants professional assessment, not a DIY patch.
Routine Maintenance You Can Do Yourself
A handful of simple tasks, done periodically, extend the life of your plumbing and catch small problems before they grow:
- Check under sinks for drips every few months. Place your hand along supply lines and P-traps to feel for moisture.
- Clean faucet aerators - unscrew the small screen at the tip of the faucet, rinse away mineral deposits, and replace. This restores flow and extends faucet life.
- Test your toilet for silent leaks by adding a few drops of food coloring to the tank. If color appears in the bowl after ten minutes without flushing, the flapper needs replacement.
- Run water in infrequently used fixtures (guest baths, basement sinks) every few weeks to keep P-trap water seals intact and prevent sewer gas from entering the home.
- Flush your water heater annually to remove sediment that reduces efficiency. Consult your heater's manual, and if you are unsure, have a plumber demonstrate the process first.
Some common misconceptions around maintenance - like assuming slow drains are always safe to ignore - are covered in our guide to home maintenance myths that cost money.
When to Call a Licensed Plumber
Plumbing knowledge has a practical ceiling for safe DIY work. The following situations consistently require a licensed professional:
- Any work that opens walls, floors, or ceilings to access supply or drain lines
- Replacing or rerouting pipe runs
- Installing new fixtures that require new supply or drain connections
- Anything involving a gas water heater's gas line or connections
- Sewer line inspections, repairs, or replacements
- Work that requires a local building permit - which in most US jurisdictions includes any significant alteration to your home's plumbing layout
For a clear framework on where the DIY line sits, see our guide to DIY tasks vs. jobs for a licensed professional.
Permits and Insurance: Know Before You Start
Many jurisdictions require permits for plumbing work that goes beyond simple fixture repairs. Unpermitted work can complicate home sales, insurance claims, and code compliance inspections. Check with your local building department before starting any project that touches supply or drain lines.
Homeowners' insurance policies vary widely in what water damage they cover and whether improper DIY repairs affect a claim. Review your policy and, if needed, consult a licensed insurance agent before attempting any significant plumbing work. For a general overview of coverage considerations, explore our insurance basics hub.
This article is for general informational purposes only. Plumbing work can involve safety and code compliance risks. Always verify local permit requirements and consult a licensed plumbing professional for work beyond basic maintenance.
Frequently Asked Questions

Author
Home & Appliances Editorial Team
Home & Appliances Editorial Team is the collective byline for our editorial team and contributor network. Articles published under this byline or an editorial pen name are researched, written, and reviewed according to our editorial standards for clarity, consistency, and independence before publication.
View all articles →